
[su_dropcap style=”flat”]C[/su_dropcap]ounter-Strike: Global Offensive (CS: GO) is a popular multiplayer first-person shooter video game developed by Valve and Hidden Path Entertainment. “VAC was unable to verify your game session” is one of the most annoying errors that many of you have encountered already, and today you’re here for the solution.
This article will provide you with a list of solutions that will help you remove the error message “VAC was unable to verify the game session“. The good news is the error can be fixed in simple steps. So follow the top working solutions given below to get rid of the CSGO unable to verify VAC error and resume playing.
Related Articles:
- 8 Ways to Fix WOW51900319 Error in World of Warcraft
- Is Uplay Connection Lost? Here are 5 Ways to Fix it
Methods to Fix VAC Was Unable to Verify Your Game Session Error
[su_divider top=”no” divider_color=”#000000″]
Method 1: Reboot Your Computer
Rebooting your computer should be the first thing to do. Sometimes, the open apps and processes on your computer might be accessing your game files, causing VAC to fail to verify the files. Restarting your system can solve the issue.
[su_divider top=”no” divider_color=”#000000″]
Method 2: Verify Game Files
The integrity issues with your game files may also be the reason behind the error. To resolve the issue, you must check game files with the steam client.
Follow the steps below to do the same:
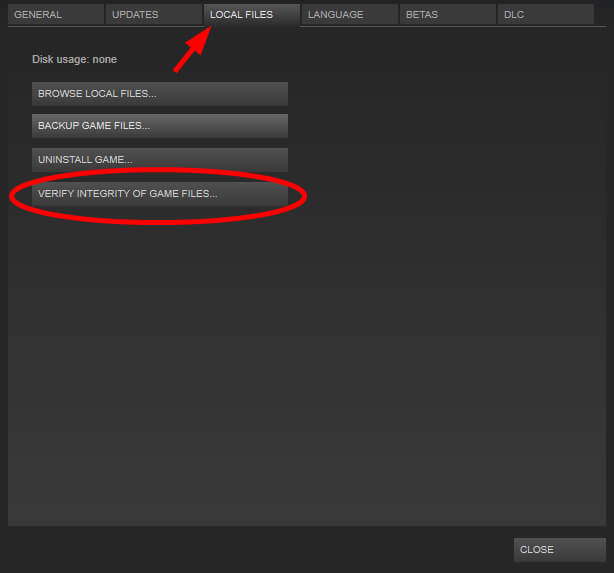
- Open your Steam client and click LIBRARY.

- Right-click on Counter-Strike: Global Offensive game and select Properties at the end of the list.

- Now go to the LOCAL FILES tab and then select VERIFY INTEGRITY OF GAME FILES.
- Wait for the process to end, and then click the CLOSE button.
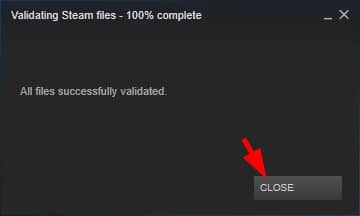
- Restart your game and see if the error has been resolved.
[su_divider top=”no” divider_color=”#000000″]
Method 3: Restart Steam Client
The problem in the steam client may also be one of the reasons you are encountering CSGO VAC was unable to verify your game session error. Restarting the Steam client can help resolve the issue.
Here’s what you have to do:
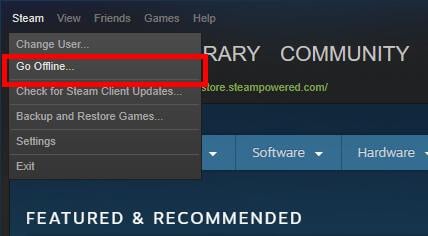
- Go to steam client and then click on the Steam tab in the top-left corner of the screen.
- Now click on Exit from the context menu.

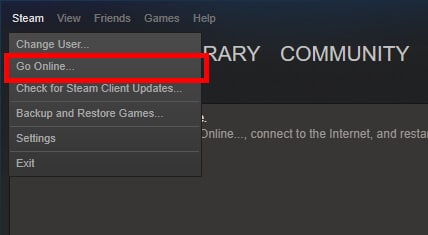
- Open steam client again and click on steam. After that, click on Go Offline… option in the context menu.
- Now click on RESTART IN OFFLINE MODE button.
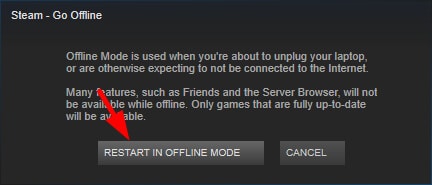
- In the next step, you have to click on the Steam tab again and select the Go online… option from the context menu.
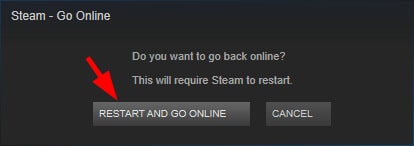
- Press RESTART AND GO ONLINE button.
- Launch the game again and check if the error still persists.
[su_divider top=”no” divider_color=”#000000″]
Method 4: Repair Steam Client
If restarting the Steam Client isn’t working for you, then there are chances that your Steam client is corrupted or contains bad files.
To repair steam client follow the steps given below:
- Click Steam on the left corner of your Steam Client, then click Exit.

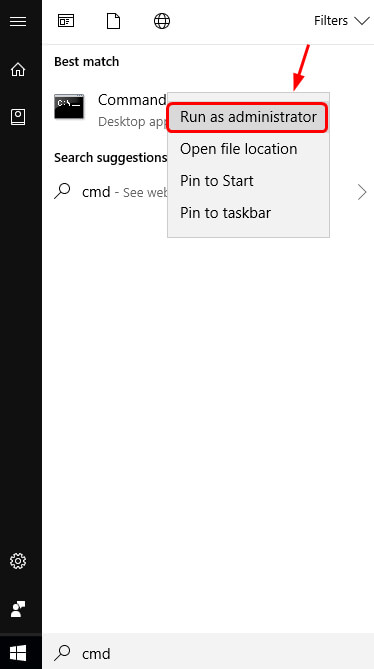
- Go to the Start button in the lower-left corner of your screen.
- Type cmd in the search box, then right-click Command Prompt and click Run as administrator.

In Command Prompt, type:
“C:\Program Files (x86)\Steam\bin\SteamService.exe” /repair
- Then press Enter key on your keyboard.
- Run Steam Client and launch the game again to check if the error is fixed.
Note: You can change the address if your file is in a different location.
[su_divider top=”no” divider_color=”#000000″]
Method 5: Repair Steam Files
This method fixes important Steam library files that are corrupt.
Here are the steps:
- First of all, delete every item inside the folder “C:\Program Files (x86)\Steam\SteamApps\common\Counter-Strike Global Offensive\csgo\maps\workshop”.
- In the next step, go to “C:\Program Files (x86)\Steam\SteamApps\common\Counter-Strike Global Offensive\csgo\maps\graphs\workshop” and, again, delete everything in the folder.
- Now relaunch Steam. It will download the fresh copies of the deleted files.
- Check if the VAC was unable to verify your game session error has been resolved.
[su_divider top=”no” divider_color=”#000000″]
Method 6: Exclude the Game Directory from Antivirus Scans
If you have an antivirus installed on your computer, then it may automatically scan your game files in the background and prevents VAC from verifying the files. The best thing to stop this from happening is whitelisting the Steam directory and the game you are having issues with so that they won’t be automatically scanned.
[su_divider top=”no” divider_color=”#000000″]
Method 7: Delete Temporary Files
Sometimes the temporary files that your computer has stored over time can also be the reason behind this issue. You can try deleting these files to get rid of the error.
Here are the steps to do so:
- Open the Run command.
- Type ‘%temp%’ and hit Enter or click the Ok button.
- Select all the items in the list by pressing Ctrl + A. Then press Shift + Delete to clear them.
- Click the Yes button to confirm.
- Launch Steam and see if the problem has been resolved.
[su_divider top=”no” divider_color=”#000000″]
Method 8: Update Your Drivers
You may get this VAC error if you’re not using the correct driver or it’s out of date. Updating your drivers can help resolve issues that could be preventing your game from operating properly. You can update it manually or automatically.
[su_divider top=”no” divider_color=”#000000″]
Final Words
We hope you’ve found the above methods to resolve “VAC unable to verify game session” useful. You can get rid of the error by using these easy fixes.
If you have any questions related to these methods, leave your message in the comment section.


![How to Fix [pii_email_57bde08c1ab8c5c265e8] Error](https://thetechvibes.com/wp-content/uploads/2021/08/How-to-Fix-pii_email_57bde08c1ab8c5c265e8-Error-218x150.png "How to Fix [pii_email_57bde08c1ab8c5c265e8] Error?")


