
[su_dropcap style=”flat”]M[/su_dropcap]any of you heard about Computer lag, but there is a Mouse lag too. Have you ever experienced that your mouse is lagging, slow, stuttering, or freezing when using the device? You might notice that the movement of your mouse pointer is not in sync with your hand movement at all.
According to a few Windows 10 users, there is an issue of mouse lag. The cursor is freezing and lagging, and also, the lack of smooth mouse movement will cause poor user experience. The mouse lagging in Windows 10 takes time to complete specific tasks and the left and right clicks happen slower that make users crazy.
Now, you might be wondering why is my mouse lagging and how can I fix it. Fortunately, there are several ways that will help you to fix Mouse Lag Windows 10 issue easily and effectively.
Related Posts:
- Logitech Wireless Mouse Not Working-8 Easy Ways to Fix the Issue
- Fixed: Wi-Fi doesn’t have a valid IP configuration
- The Default Gateway is not Available on Windows 10? 6 Ways To Fix
Effective Solutions to Fix Mouse Lag
If the worse performance of your mouse stops you from playing certain video games and you’re unable to complete your tasks on time, here’re some solutions for you.
[su_divider top=”no” divider_color=”#070606″]
Solution 1: Reinstall/Update the Mouse Driver
If your mouse drivers are outdated or corrupted, you’ll have to face mouse lag issue without any doubt. In that case, you can try to reinstall or update the mouse driver using the steps below:
- Press Windows + R keys on your keyboard to open the Run utility.
- Type “devmgmt.msc” and click the OK button.

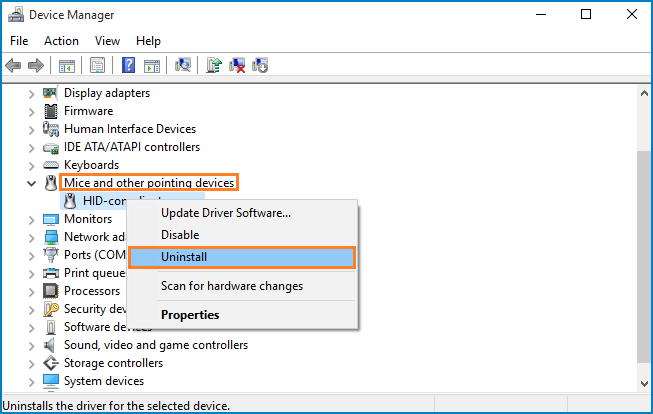
- Expand the section of Mice and other pointing devices.
- Right-click on your mouse driver and choose the Uninstall option. Then click OK to confirm.
- After that, restart your computer and Windows will automatically reinstall the mouse driver.
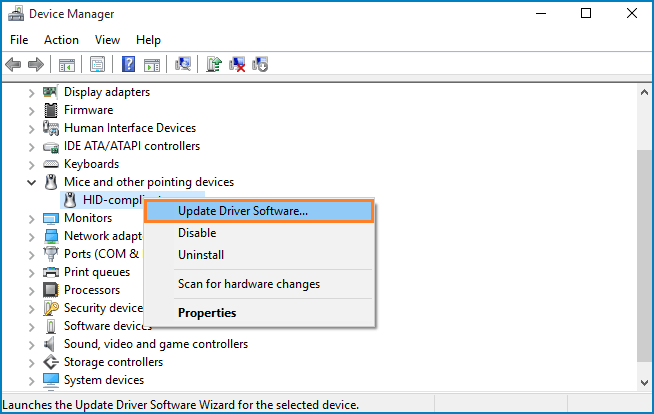
- Now to update the mouse driver, right click your mouse driver, select Update Driver Software option from the drop-down menu.
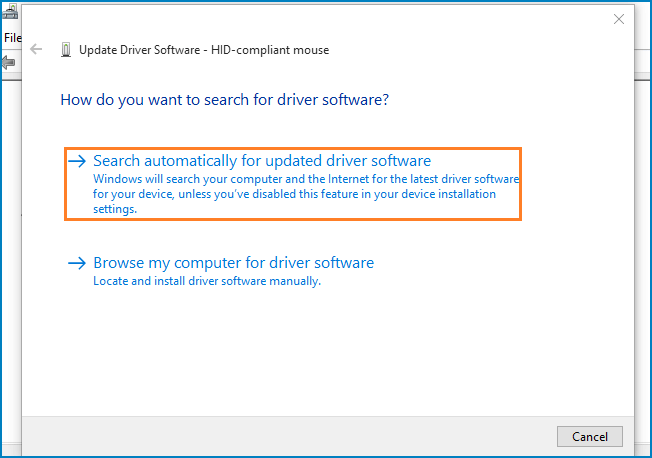
- Choose the option, Search automatically for updated driver software. This will allow Windows 10 to find the latest driver update and install it on your computer correctly.
- Follow the on-screen instructions to update your driver.
- Once the task completes, restart your PC and check to see if the mouse shuttering issue is resolved.
[su_divider top=”no” divider_color=”#070606″]
Solution 2: Disable and Enable Scroll Inactive Windows
There is a feature in Windows 10 that allows users to scroll within inactive windows by simply hovering your mouse pointer over such Window. Sometimes, disabling this feature and re-enabling, if needed, might help to fix the mouse lagging issue.
Here are the steps:
- Go to Settings and choose Devices from the list of options.
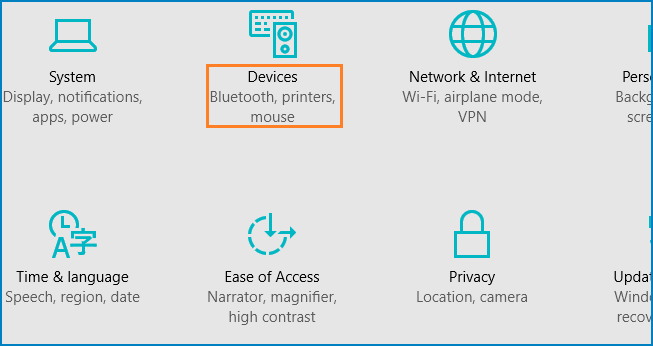
- Choose Mouse & Touchpad option from the menu on the left side.
- Find the option, Scroll inactive windows when I hover over them. Click on the button under it and enable or disable the feature.
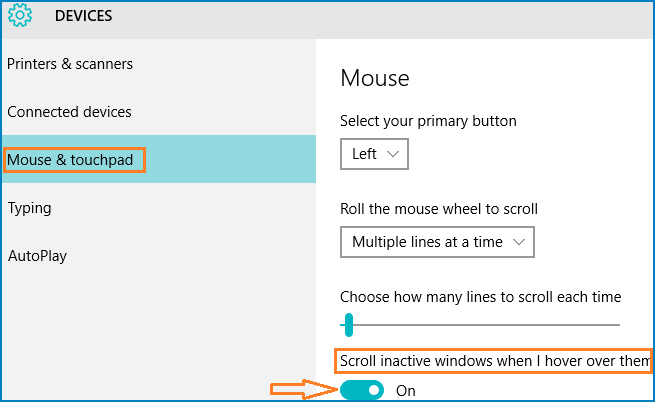
- Restart your computer and check if the problem still persists.
[su_divider top=”no” divider_color=”#070606″]
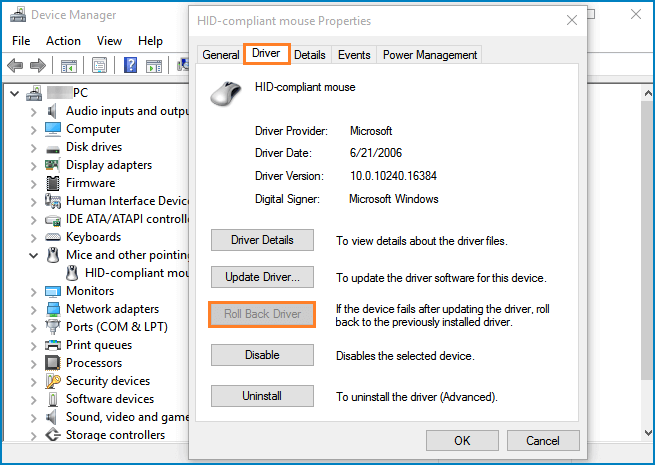
Solution 3: Roll Back the Mouse Driver
Rolling back your mouse drivers may also help you to get rid of mouse lagging Windows 10 issue.
To do so, you need to follow the given steps:
- Press Windows Key + X together and select Device Manager from the list.
- Once Device Manager opens, locate Mice and other pointing devices and then double click your mouse driver.
- Go to the Driver tab and click on the Roll Back Driver button. If the button is grayed out, this method won’t work for you.
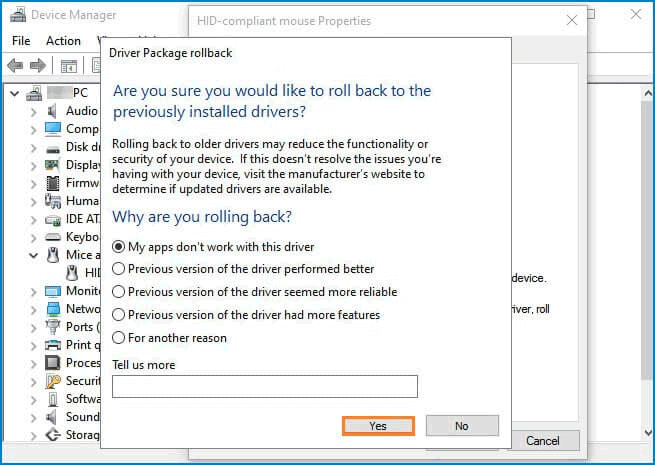
- After you click it, the Driver Package rollback window will appear on your screen. Choose one reason that prompts you to roll back the driver and then click Yes.
That’s all you need to do. Now check if the issue of mouse moving slow has been improved.
[su_divider top=”no” divider_color=”#070606″]
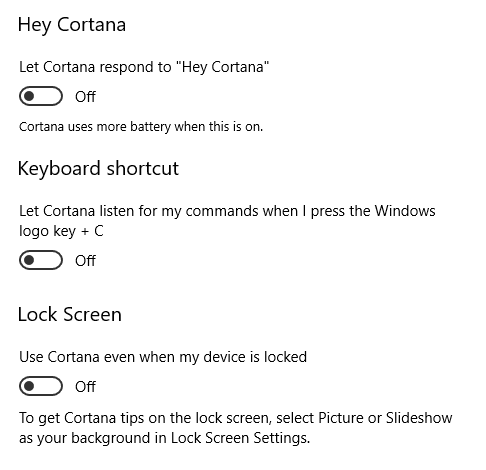
Solution 4: Turn off Cortana
You may find this solution quite unusual, but many users report that after turning off Cortana the mouse freezing issues disappear.
Follow the steps below to turn off Cortana on Windows 10:
- Click on the Cortana icon on the taskbar and click the Settings icon within the Cortana menu.
- Go to the Talk to Cortana tab.
- Now turn every Cortana option Off.
[su_divider top=”no” divider_color=”#070606″]
Solution 5: Disconnect Other USB Devices
If you are using other USB devices, they can also disturb your mouse performance and cause a lag issue. You can disconnect your portable hard drive from the USB port of your computer if there is one connected.
According to many users, the issue was resolved after disconnecting USB devices connected to your PC.
[su_divider top=”no” divider_color=”#070606″]
Solution 6: Disable Fast Startup
Fast Startup is a very useful feature in Windows 10, but users reported that it is one of the causes of mouse lag. To fix this issue, you need to disable the Fast Startup feature.
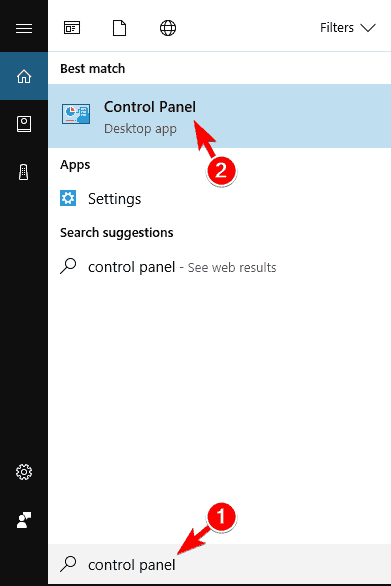
- Press Windows Key + S together and type “control panel”. Choose Control Panel from the list and open it.
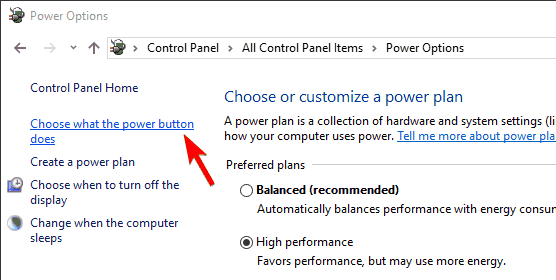
- Now click Power Options to open it.

- After that, click on Choose what the power button does.
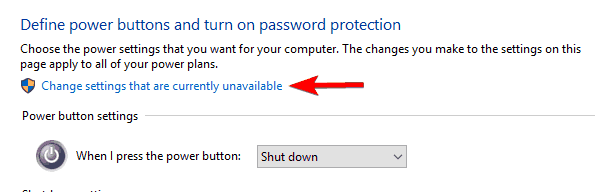
- Click on Change settings that are currently unavailable.
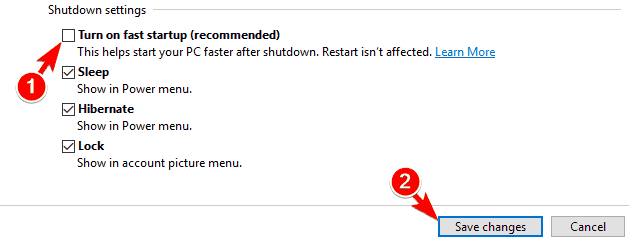
- Under the Shutdown settings, uncheck Turn on fast startup (recommended) and click Save changes.
This solution should resolve the issue, and your mouse will start working again.
[su_divider top=”no” divider_color=”#070606″]
Solution 7: Change the Power Management Settings
Configure your power settings by following the steps below:
- Press down the Windows + R keys on your keyboard to open the Run utility.
- Type “devmgmt.msc” and click the OK button to launch the Device Manager window.
- Find Universal Serial Bus controllers and expand it.
- Right-click on a USB Hub and select Properties from the context menu.
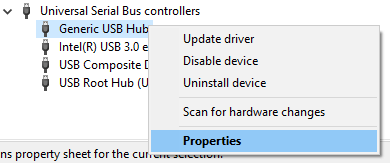
- Go to the Power Management tab.
- Uncheck the option, Allow the computer to turn off this device to save power.

- Click OK to save changes.
- Restart your PC and test if the Mouse lagging in Windows 10 issue is resolved.
[su_divider top=”no” divider_color=”#070606″]
Final Words
Mouse lag is one of the most irritating problems that most of the Windows 10 users are facing nowadays. We hope that the solutions mentioned above were helpful to you and your mouse is now working correctly.
If you find any difficulty in any solution, drop your questions in the comments section below.


![How to Fix [pii_email_57bde08c1ab8c5c265e8] Error](https://thetechvibes.com/wp-content/uploads/2021/08/How-to-Fix-pii_email_57bde08c1ab8c5c265e8-Error-218x150.png "How to Fix [pii_email_57bde08c1ab8c5c265e8] Error?")


